Adding a verb to the dotnet CLI tooling
03 Oct 2016 - 1484 wordsThe dotnet CLI tooling comes with several built-in cmds such as build, run and test, but it turns out it’s possible to add your own verb to that list.
Arbitrary cmds
From Intro to .NET Core CLI - Design
The way the
dotnetdriver finds the command it is instructed to run usingdotnet {command}is via a convention; any executable that is placed in the PATH and is nameddotnet-{command}will be available to the driver. For example, when you install the CLI toolchain there will be an executable calleddotnet-buildin your PATH; when you rundotnet build, the driver will run thedotnet-buildexecutable. All of the arguments following the command are passed to the command being invoked. So, in the invocation ofdotnet build --native, the--nativeswitch will be passed todotnet-buildexecutable that will do some action based on it (in this case, produce a single native binary).This is also the basics of the current extensibility model of the toolchain. Any executable found in the PATH named in this way, that is as
dotnet-{command}, will be invoked by thedotnetdriver.
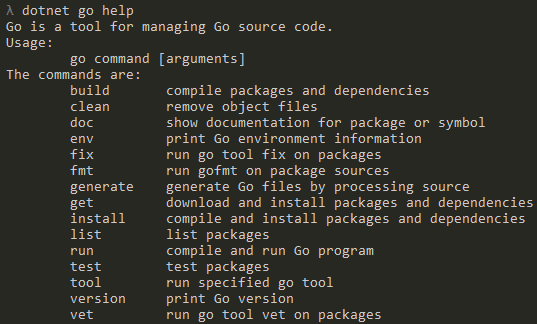
Fun fact: This means that it’s actually possible to make a dotnet go command! You just need to make a copy of go.exe and rename it to dotnet-go.exe
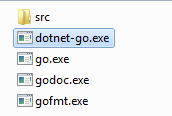
Yay dotnet go (I know, completely useless, but fun none-the-less)!!
(and yes before you ask, you can also make dotnet dotnet work, but please don’t do that!!)
With regards to documentation, there’s further information in the ‘Adding a Command’ section of the Developer Guide. Also the source code of the dotnet test command is a really useful reference and helped me out several times.
Before I go any further I just want to acknowledge the 2 blog posts listed below. They show you how to build a custom command that will compresses all the images in the current directory and how to make it available to the dotnet tooling as a NuGet package:
However they don’t explain how to interact with the current project or access it’s output. This is what I wanted to do, so this post will pick up where those posts left off.
Information about the current Project
Any effective dotnet verb needs to know about the project it is running in and helpfully those kind developers at Microsoft have created some useful classes that will parse and examine a project.json file (available in the Microsoft.DotNet.ProjectModel NuGet package). It’s pretty simple to work with, just a few lines of code and you’re able to access the entire Project model:
Project project;
var currentDirectory = Directory.GetCurrentDirectory();
if (ProjectReader.TryGetProject(currentDirectory, out project))
{
    if (project.Files.SourceFiles.Any())
    {
        Console.WriteLine("Files:");
        foreach (var file in project.Files.SourceFiles)
            Console.WriteLine("  {0}", file.Replace(currentDirectory, ""));
    }
    if (project.Dependencies.Any())
    {
        Console.WriteLine("Dependencies:");
        foreach (var dependancy in project.Dependencies)
        {
            Console.WriteLine("  {0} - Line:{1}, Column:{2}",
                    dependancy.SourceFilePath.Replace(currentDirectory, ""),
                    dependancy.SourceLine,
                    dependancy.SourceColumn);
        }
    }
    ...
}
Building a Project
In addition to knowing about the current project, we need to ensure it successfully builds before we can do anything else with it. Fortunately this is also simple thanks to the Microsoft.DotNet.Cli.Utils NuGet package (along with further help from Microsoft.DotNet.ProjectModel which provides the BuildWorkspace):
// Create a workspace
var workspace = new BuildWorkspace(ProjectReaderSettings.ReadFromEnvironment());

// Fetch the ProjectContexts
var projectPath = project.ProjectFilePath;
var runtimeIdentifiers =
    RuntimeEnvironmentRidExtensions.GetAllCandidateRuntimeIdentifiers();
var projectContexts = workspace.GetProjectContextCollection(projectPath)
       .EnsureValid(projectPath)
       .FrameworkOnlyContexts
       .Select(c => workspace.GetRuntimeContext(c, runtimeIdentifiers))
       .ToList();

// Setup the build arguments
var projectContextToBuild = projectContexts.First();
var cmdArgs = new List<string>
{
    projectPath,
    "--configuration", "Release",
    "--framework", projectContextToBuild.TargetFramework.ToString()
};

// Build!!
Console.WriteLine("Building Project for {0}", projectContextToBuild.RuntimeIdentifier);
var result = Command.CreateDotNet("build", cmdArgs).Execute();
Console.WriteLine("Build {0}", result.ExitCode == 0 ? "SUCCEEDED" : "FAILED");
When this runs you get the familiar dotnet build output if it successfully builds or any error/diagnostic messages if not.
Integrating with BenchmarkDotNet
Now that we know the project has produced an .exe or .dll, we can finally wire-up BenchmarkDotNet and get it to execute the benchmarks for us:
try
{
    Console.WriteLine("Running BenchmarkDotNet");
    var benchmarkAssemblyPath =
        projectContextToBuild.GetOutputPaths(config).RuntimeFiles.Assembly;
    var benchmarkAssembly =
        AssemblyLoadContext.Default.LoadFromAssemblyPath(benchmarkAssemblyPath);
    Console.WriteLine("Successfully loaded: {0}\n", benchmarkAssembly);
    var switcher = new BenchmarkSwitcher(benchmarkAssembly);
    var summary = switcher.Run(args);
}
catch (Exception ex)
{
    Console.WriteLine("Error running BenchmarkDotNet");
    Console.WriteLine(ex);
}
Because BenchmarkDotNet is a command-line tool we don’t actually need to do much work. It’s just a case of creating a BenchmarkSwitcher, giving it a reference to the dll that contains the benchmarks and then passing in the command line arguments. BenchmarkDotNet will then do the rest of the work for us!
However if you need to parse command line arguments yourself I’d recommend re-using the existing helper classes as they make life much easier and will ensure that your tool fits in with the dotnet tooling ethos.
The final result
Finally, to test it out, we’ll use a simple test app from the BenchmarkDotNet Getting Started Guide, with the following in the project.json file (note the added tools section):
{
  "version": "1.0.0-*",
  "buildOptions": {
    "emitEntryPoint": true
  },
  "dependencies": {
    "Microsoft.NETCore.App": {
      "type": "platform",
      "version": "1.0.0-rc2-3002702"
    },
    "BenchmarkDotNet": "0.9.9"
  },
  "frameworks": {
    "netcoreapp1.0": {
      "imports": "dnxcore50"
    }
  },
  "tools": {
    "BenchmarkCommand": "1.0.0"
  }
}
Then after doing a dotnet restore, we can finally run our new dotnet benchmark command:
λ dotnet benchmark --class Md5VsSha256
Building Project - BenchmarkCommandTest
Project BenchmarkCommandTest (.NETCoreApp,Version=v1.0) will be compiled because expected outputs are missing
Compiling BenchmarkCommandTest for .NETCoreApp,Version=v1.0
Compilation succeeded.
    0 Warning(s)
    0 Error(s)
Time elapsed 00:00:00.9760886

Build SUCCEEDED

Running BenchmarkDotNet
C:\Projects\BenchmarkCommandTest\bin\Release\netcoreapp1.0\BenchmarkCommandTest.dll
Successfully loaded: BenchmarkCommandTest, Version=1.0.0.0, Culture=neutral, PublicKeyToken=null

Target type: Md5VsSha256
// ***** BenchmarkRunner: Start   *****
// Found benchmarks:
//   Md5VsSha256_Sha256
//   Md5VsSha256_Md5
// Validating benchmarks:
// **************************
// Benchmark: Md5VsSha256_Sha256
// *** Generate ***
// Result = Success
// BinariesDirectoryPath = C:\Projects\BDN.Auto\binaries
// *** Build ***
// Result = Success
// *** Execute ***
// Launch: 1
// Benchmark Process Environment Information:
// CLR=CORE, Arch=64-bit ? [RyuJIT]
// GC=Concurrent Workstation

...
If you’ve used BenchmarkDotNet before you’ll recognise its output, if not it’s output is all the lines starting with //. A final note, currently the Console colours from the command aren’t displayed, but that should be fixed sometime soon, which is great because BenchmarkDotNet looks way better in full-colour!!
Discuss this post in /r/csharp